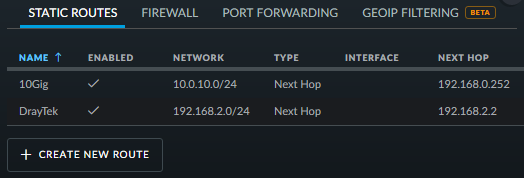
Welcome to my blog.  Hopefully here you will find some interesting and detailed articles relating to Windows Home Server, Home Computing and General IT.

VMware Raw Device Map via Command Line

Logon to your ESX host and run the following command to map a physical disk to a rdm file in the folder where you VM is located:

vmkfstools -r /vmfs/devices/disks/naa.XXXXXXXXXXXXXXXXXXXXXXXXX   rdm1.vmdk

Edit your VMX file to point to the newly created RDM disk:

scsi0:2.present = "TRUE"
scsi0:2.deviceType = "scsi-hardDisk"
scsi0:2.fileName = "rdm1.vmdk"
scsi0:2.mode = "independent-persistent"
scsi0:2.redo = ""

Setting up Zabbix Agent to monitor CPU and HDD Temperatures

First turn off the firewall and disable selinux:

systemctl disable firewalld vi /etc/selinux/config

Install the Zabbix 3.4 source repo and install zabbix and lm_sensros and smartmontools:

rpm -ivh https://repo.zabbix.com/zabbix/3.4/rhel/7/x86_64/zabbix-release-3.4-2.el7.noarch.rpm 
yum install -y zabbix-agent lm_sensors smartmontools

Edit /etc/zabbix/zabbix_agentd.conf and set the Server and ServerActive to the hostname of your zabbix server. Create a sudoers.d file for zabbix in /etc/sudoers.d/zabbix:

zabbix ALL=NOPASSWD:/usr/sbin/smartctl zabbix ALL=NOPASSWD:/bin/sensors

Create a new files in /etc/zabbix/zabbix_agentd.d called hdd_temps.conf and enter information like so:

[Read More]

Setting postgresql default database locale

UPDATE pg_database SET datallowconn = TRUE WHERE datname = 'template0'; 
UPDATE pg_database SET datistemplate = FALSE WHERE datname = 'template1';
drop database template1;
CREATE DATABASE template1 ENCODING = 'utf8' TEMPLATE = template0 LC_CTYPE ='en_US.utf8' LC_COLLATE = 'en_US.utf8';
UPDATE pg_database SET datistemplate = TRUE WHERE datname = 'template1'; 
UPDATE pg_database SET datallowconn = FALSE WHERE datname = 'template0';`

Setting up mediasmartserverd for Centos 7 on EX490

This post details setting up mediasmartserverd under Centos 7 on an HP EX490. This allows for the status LED to be used as an indicator for updates and also the drive lights to be illuminated according to disk state/activity. The mediasmartserverd binary is built on the local machine:

yum -y install wget zip libudev-devel
yum -y groupinstall "Development Tools"
wget https://github.com/merelin/mediasmartserverd/archive/0.5.6.tar.gz
tar -zxvf 0.5.6.tar.gz
cd mediasmartserverd-0.5.6
make 
cp mediasmartserverd /usr/local/sbin/ 
vi /usr/lib/systemd/system/mediasmartserverd.service

Then enter the following into the file and exit with [Esc]:wq:

[Read More]

Accessing DrayTek 130 Modem Status Page via USG

This is more of a note for me but may be useful for some. How to connect to the DrayTek status page from your internal network. First bring up the USG UI and enter in a new static route: USGnewRoute Then login to your USG via SSH and run: configure set interfaces ethernet eth3 address 192.168.2.100/24 commit This sets an IP address for the port that the modem is connected to. Then from the USG, login to the draytek - telnet 192.168.2.1 and run: ip route add 192.168.0.0 255.255.255.0 192.168.2.2 3 static You then should be able to browse to https://192.168.2.1/ and login to your DrayTek 130 Modem: 130-Login

[Read More]

FTTPoD available in Southampton but who from?

I used the BT line checker and got the magically line FTTPoD showing as enabled for my cabinet. However I can’t find anyone who will supply me with this service: FTTPoD 
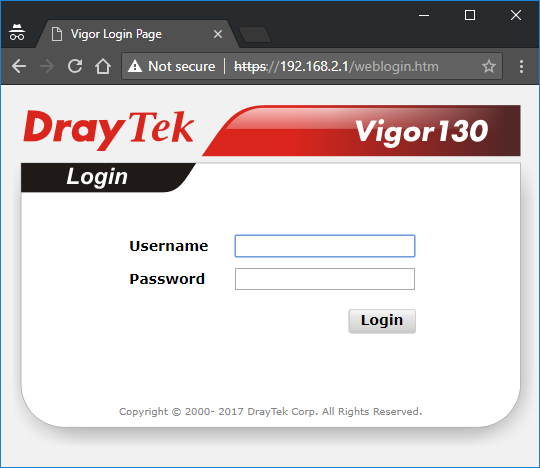
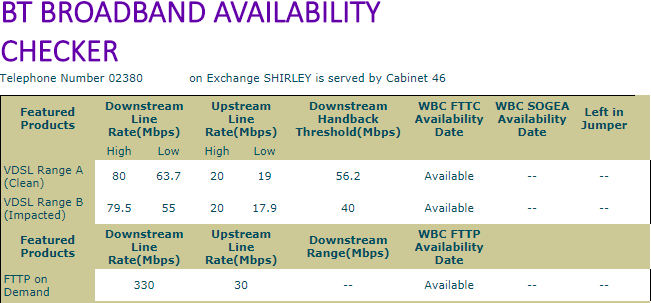
Maybe I will just have to wait for Infinity 3/4 to be available - I wonder how long that takes.

Getting Subsonic working behind Nginx

The subsonic Web UI uses frames as if you just proxy subsonic with SSL/TLS termination like you would with any other website you will find the pages does not load. You need to add a directive to your configuration: add_header X-Frame-Options SAMEORIGIN; This should also work with madsonic.

Installing LetsEncrypt certbot from GitHub

Sometimes there the delay between a new certbot release from LetsEncrypt and the time it hits the Ubuntu LaunchPad PPA.  However there is not much involved in setting up Ubuntu to use certbot directly from the GitHub source.  I tested the following out on Ubuntu 14.04 LTS and 16.04 LTS and it worked without a hitch:

sudo apt-get remove certbot
sudo add-apt-repository --remove ppa:certbot/certbot
cd /opt
sudo git clone https://github.com/certbot/certbot.git
cd certbot
sudo git checkout v0.21.1
sudo ln -s /opt/certbot/certbot-auto /usr/bin/certbot
certbot renew
sudo apt-get autoremove

To update simply go to the repo and `git checkout` the latest version.

[Read More]

Re-enabling a failed RAID Array HP410

Sometimes a disk will drop out a RAID array, especially if you have drives that don’t support a low latency error recovery such as the Seagate Barracuda SFF drives.  You should notice an alarm in ESX or your operating system that says the Logical Drive has failed.  Associated with this will be a physical drive failure too. To recovery from the problem you will need to remove the affected drive for 10 seconds and then re-insert the drive into the slot it came from.  You can do all of this while the system is booted into the array management software. Once you have the physical drive recognised as operational again then you can make steps to recover the logical drive.  In my case I am using ESX but any other operating system that can use the hpssacli utility should be the same. First show the status of the logical drive:

[Read More]